

How To Put Rain Gutters On A House
How to Install and Supervene upon Gutters
Learn how to install strong, sleek-looking gutters.
![]() Time
Time
Multiple Days
![]() Complication
Complication
Intermediate
![]() Cost
Cost
Varies
Introduction
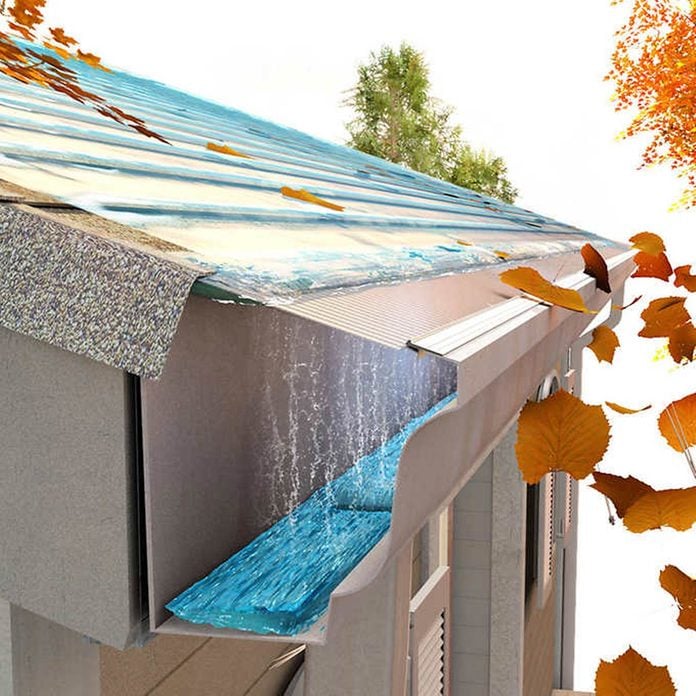
Create stronger, improve-looking gutters by modifying standard gutter systems. Minimize joints; assemble strong, sleek-looking seams; and add roof flashing to keep h2o flowing into the gutters where it belongs.
Tools Required
Materials Required
- 1 1/4" self-borer hex head screws
- ane/4" hex head screws ('zippers')
- 1/8-in. medium length rivets
- Downspouts
- Elbows
- Gutter
- Gutter flashing
- Gutter hanging strap
- Gutter sealant
Planning the Rain Gutter Replacement Project
Almost all home centers and total-service hardware stores sell guttering designed for like shooting fish in a barrel installation. But with simply a little more work, yous can use these same parts to put together pelting gutters and downspouts that are stronger and meliorate looking also.
Evaluate and Plan the Gutter Replacement Project
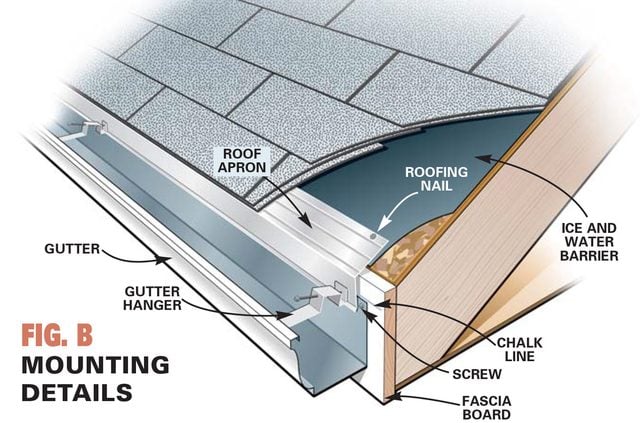
DIY gutter replacement can save you substantially over professionally installed gutters, but in that location are a few pitfalls to watch out for. Inspect the fascia and soffit (Fig. B, below) for signs of rotted wood, which must exist replaced before yous put up the rain gutters. Many houses have a trim board or crown molding nailed to the fascia just under the shingles. Y'all'll need to remove this, every bit we did, or add together a continuous strip of wood under information technology to create a flat plane for the gutters. In either case, prime number and paint bare forest before you hang the gutters.
Draw a Sketch and Measure Your Firm Earlier Installing Rain Gutters
Fig. A (beneath) shows an example of a rain gutter arrangement for a typical firm. Record the length of the rain gutter runs and marking the downspout locations. Then count up the inside and outside corners and terminate caps (note whether they are correct or left ends). Measure the top of downspouts and add together four anxiety to each for the extension away from the house at the bottom.
Each downspout requires three elbows. There are two types of elbows that turn either to the front or side of the downspout. About installations require only front elbows, merely occasionally you lot may need a side elbow, ordinarily to plough the downspout extension sideways. Here are a few planning tips:
- Locate downspouts in unobstructed areas where water can be directed away from the house. Avoid locations with obstacles like electric meters, hose bibs or sidewalks.
- Place downspouts in inconspicuous locations if possible.
- Install oversized three×iv-in. downspouts on gutters that drain large roof areas or if you live in an expanse with torrential rains.
- Slope long gutter runs (twoscore feet or more) downwardly both directions from the center and put a downspout on each end.
- Buy special roof hanger mounting straps for houses without fascia boards or for fascias that aren't vertical.
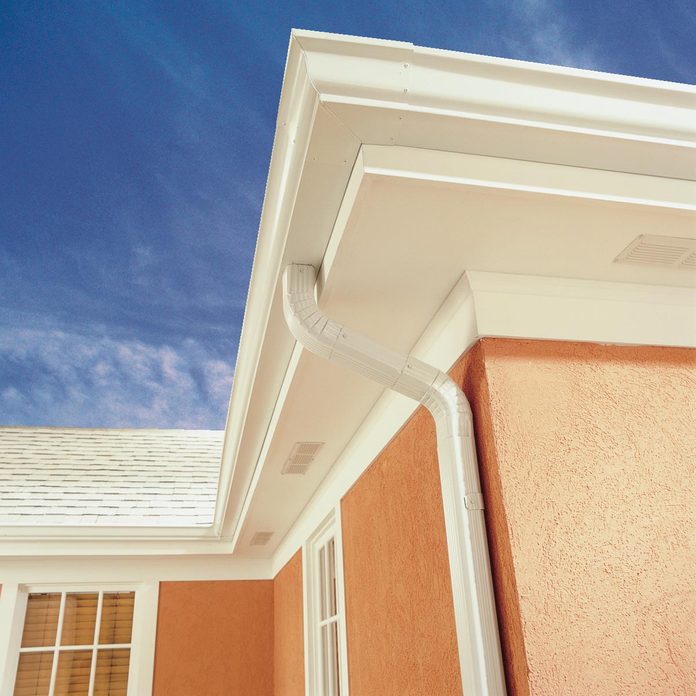
Gutter Parts and Mounting Details
Measure the horizontal pelting gutter runs and downspouts and identify the parts you'll demand.

Project step-by-step (20)
Step i
Cutting the Gutter
- It'due south much easier to bring together sections on the ground than to piece of work from the top of a ladder.
- Instead of butting parts together and covering the joints with a seam cover as recommended by the manufacturer, lap all seams from two to four inches.
- Cut the front end and dorsum sides with can snips.
- Bend the gutter and cut the lesser.

Step 2
Notch the Gutter
- Cut a ii inch long notch in the forepart lip of the gutter with tin can snips to join a rain gutter section with an inside or outside corner piece.
- Pro tip: Cut a four inch long notch to overlap and splice together gutter sections.
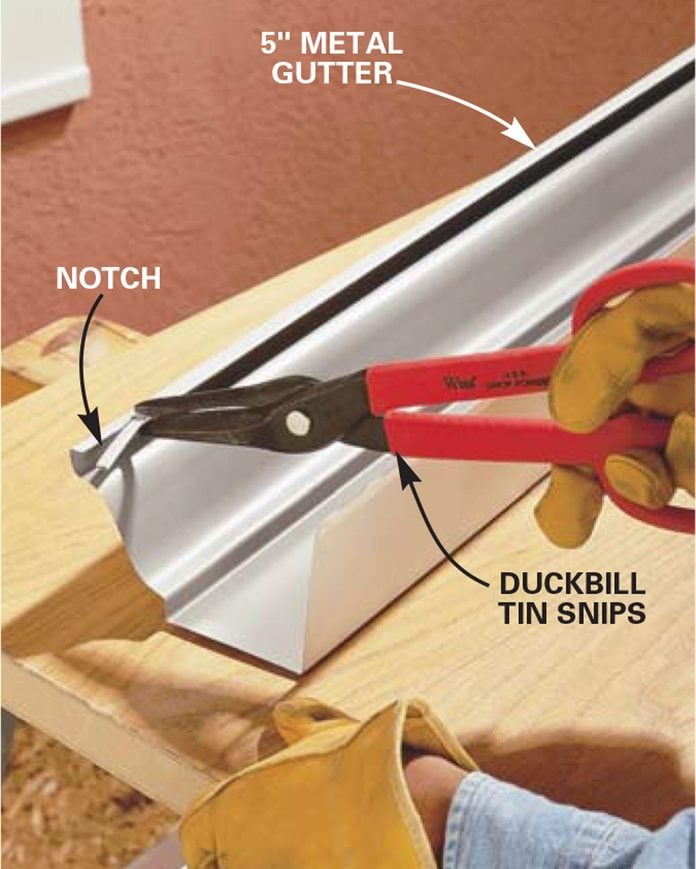
![]()
Footstep three
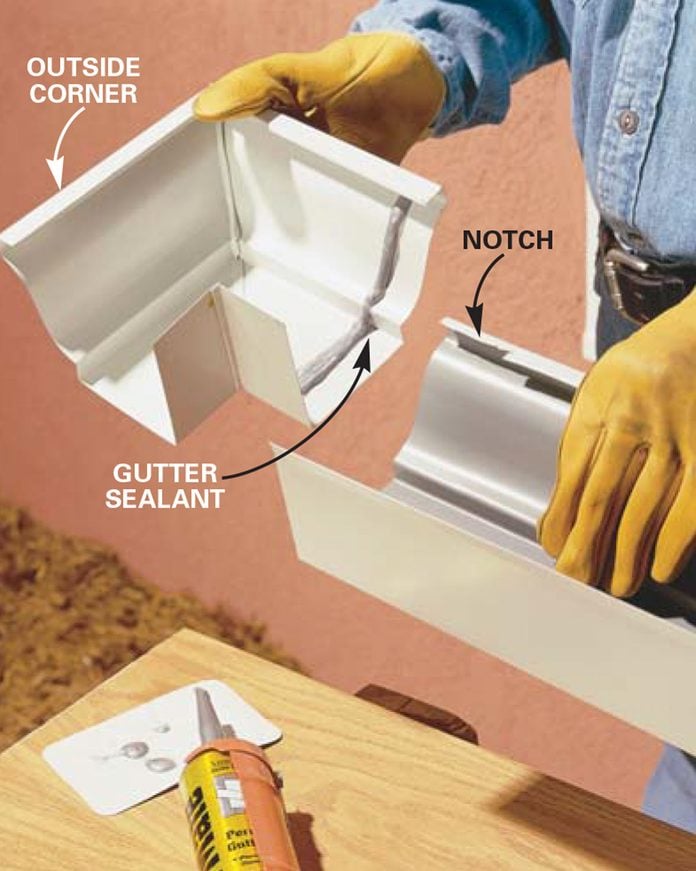
Snap the Sections Together
- Lay a bead of gutter sealant forth the corner 1-1/2-in. back from the edge.
- Claw the forepart lip of the corner over the notched department of gutter and snap it over the gutter.
Step iv
Rivet the Sections
- Bring together the gutter to the corner with six rivets in the locations shown.
- Get-go by drilling a 1/viii-in. pigsty (for 1/8-in. rivets) at the front of the gutter and installing the outset rivet with the rivet gun.
- Now drill the remaining holes and install the rivets.

Stride 5
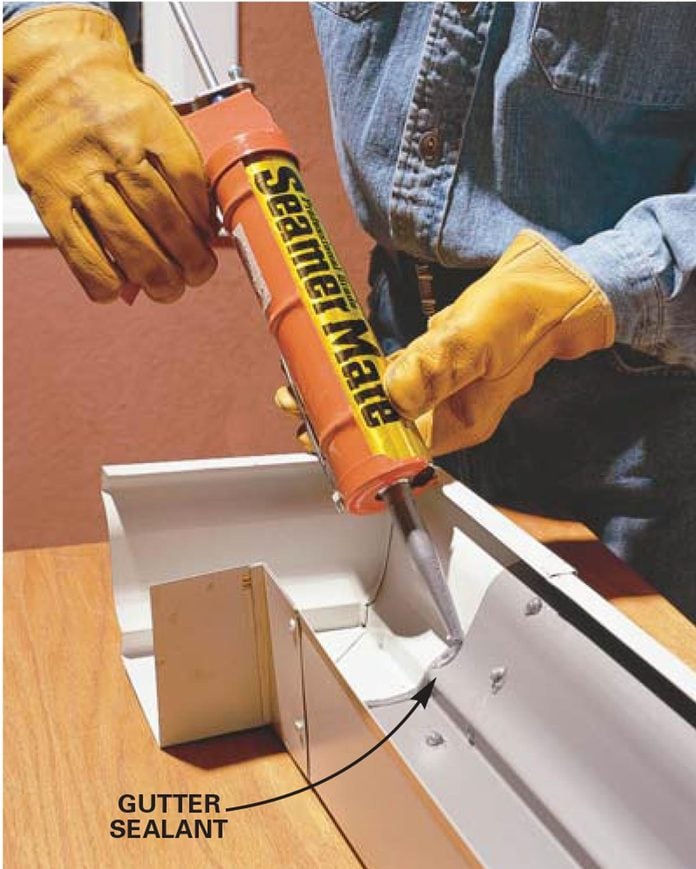
Caulk the Seam
- Caulk the seam on the inside of the rain gutter with gutter sealant.
- Put a dab of sealant over each rivet.
Step 6
Preassemble Before Installing Gutters
- We've shown joining a gutter section to a corner.
- Employ the same process to join 2 sections of gutter, except overlap the pieces at least 4 inches.
- When you're splicing gutter sections, programme ahead to leave the best-looking manufactory-cut end on the exterior if possible.
- Likewise, lap the rain gutters so the inside section is facing downhill to prevent h2o from being forced out the seam.
- Where a gutter ends, cut it to extend about an inch past the stop of the fascia lath to catch h2o from the overhanging shingles.
- Then adhere an end cap with rivets and seal the joint from the inside with gutter sealant.
Step 7
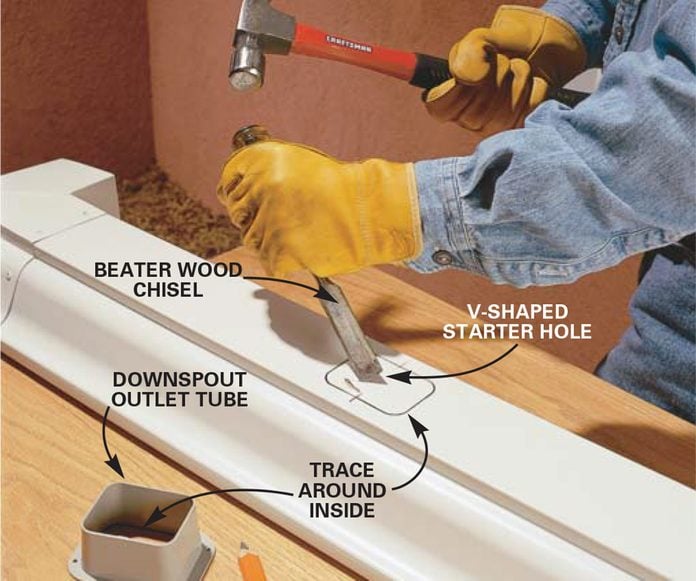
Marking the Downspout Outlet
- Get-go, measure from the corner of the firm to the centre of your chosen downspout location.
- Double-check for obstructions.
- Transfer this dimension to the gutter and cut in a downspout outlet.
- Pro tip: This method takes a few minutes longer than using one of the brusque gutter sections with a preinstalled outlet, simply it eliminates two seams and looks much neater.
- Mark the eye of the downspout outlet on the bottom of the gutter.
- Center the outlet, flange side down, over the marking and trace around the inside.
- Cut a V-shaped notch with an quondam chisel equally a starting hole for the tin snips.
- Place 2 short scraps of 2x4 side past side under the gutter to support it while yous chisel the notch.
Pace viii
Cut the Outlet Pigsty
- Cut out the outlet hole with offset tin can snips.
- Pro tip: Red tin snips cutting counterclockwise. Dark-green snips cut clockwise. Either will piece of work.
- Cutting 1/16-in. outside the line.

Step 9
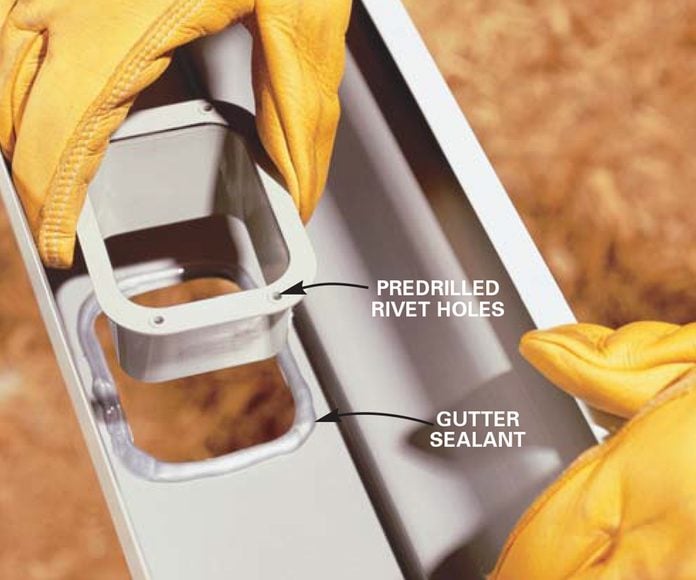
Rivet the Outlet in the Hole
- Slip the outlet into the hole and predrill one/8-in. holes for the rivets.
- Remove the outlet and run a bead of gutter sealant effectually the opening.
- Press the outlet into the caulked opening and install the rivets.
Step 10
A Picayune Gradient is All Yous Demand
- The number and size of downspouts determine how fast your gutters will empty.
- Sloping them helps eliminate standing h2o that tin can cause corrosion and leak through the seams.
- Slope each business firm gutter run down toward the downspout about 1/four-in. for every 10 feet of gutter.
- If your fascia boards are level, you can use them equally a reference for sloping the gutters.
- Check this by belongings a level against the bottom edge.
- If they aren't level, adjust the string line until a level aligned with it shows a slight gradient.
- Snap a chalk line to betoken the peak of the gutter.
- Then straighten gutter sections as y'all screw them to the fascia by aligning the top edge with the chalk line.
Pace 11
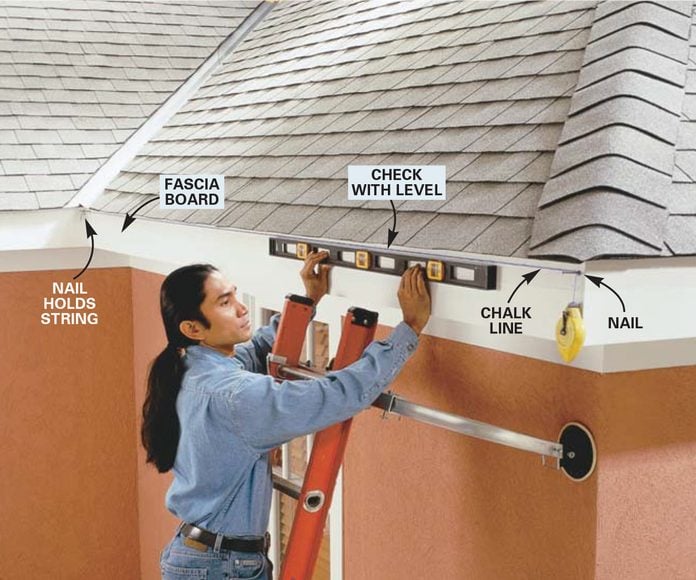
Mark the Gutter Gradient
- When installing gutters, fix the proper slope by driving a nail i/2-in. below the shingles on the loftier side of the gutter run.
- Measure out and record the distance from the bottom of the fascia board to this blast.
- Subtract 1/4-in. for every 10 feet of gutter from this measurement and marker this altitude at the low stop of the gutter run.
- Drive a nail at this mark and stretch a chalk line betwixt the two nails.
- Marshal a level with the string to check the slope. The chimera should be off-center toward the loftier side.
- Pro tip: If it'southward not, adjust the string until the bubble indicates that you have the proper slope.
- Finally, snap the string to mark a line on the fascia board.
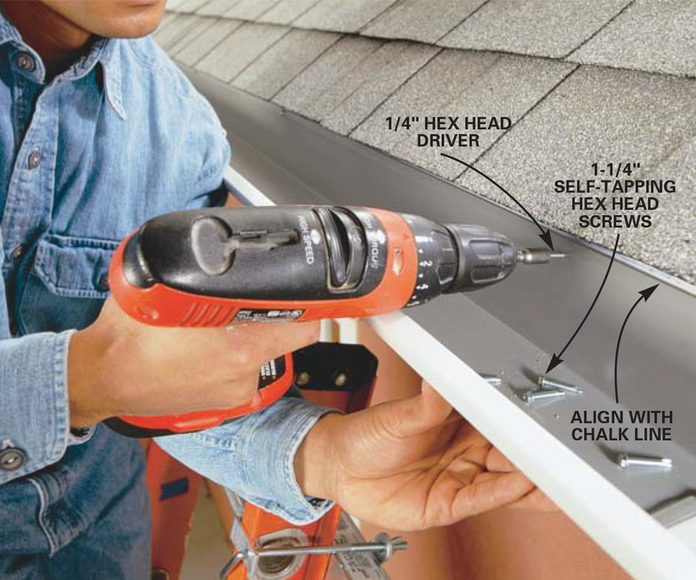
Step 12
Screw the Gutter to the Fascia
- Drive 1-1/four-in. stainless steel hex head sheet metal screws through the back of the gutter into the fascia.
- Install one screw every 2 feet.
Step 13
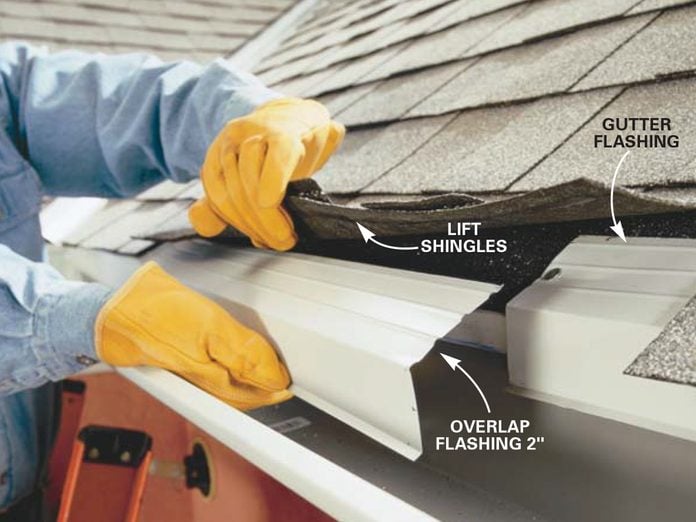
Add Gutter Flashing
- With gutter replacement, you tin can prevent water from running behind your gutters past installing a metal gutter apron flashing under the shingles and over the back edge of the gutter.
- If your home heart or hardware store doesn't sell pre-bent flashing, ask an aluminum siding contractor or local sheet metal fabricator to curve some for y'all.
- Ideally the flashing should be slid under the shingles and the roofing paper or ice and water barrier.
- Pro tip: If this isn't possible because the ice and water barrier is stuck to the sheathing, or there are too many nails and staples along the edge of the covering paper, then merely slip the flashing nether the shingles.
- Pro tip: If the flashing y'all're using is too short to reach down over the dorsum border of the gutter, slip an additional strip of sheet metal flashing nether the bent flashing and over the gutters.
- Slide gutter flashing under the shingles and secure with one-inch roofing nails every two anxiety.
- Lap sections about 2 inches.
Footstep 14
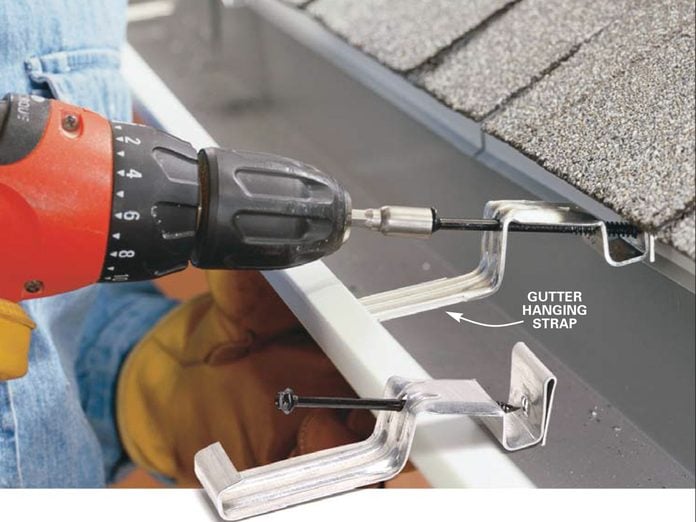
Hook on Gutter Hanging Straps
- With the gutters screwed to the fascia, it'due south a unproblematic chore to install the hidden gutter hangers.
- Install hangers every two feet to support the gutters and strengthen the front edge.
- The hangers are designed to sideslip over the back border of the gutter. But since we've covered this edge with flashing, just hold them level and drive the screws through the flashing and gutter back into the fascia.
- Pro tip: The gutter apron volition forestall you lot from slipping the hangers over the dorsum edge of the gutter equally intended.
- The big screws included with the hangers we used are a little tricky to become started, especially through steel gutters and flashing.
- Spin them at loftier speed without applying much pressure until the screw tip bites into the metallic.
- Then lean on the drill and bulldoze them into the fascia.
Step 15
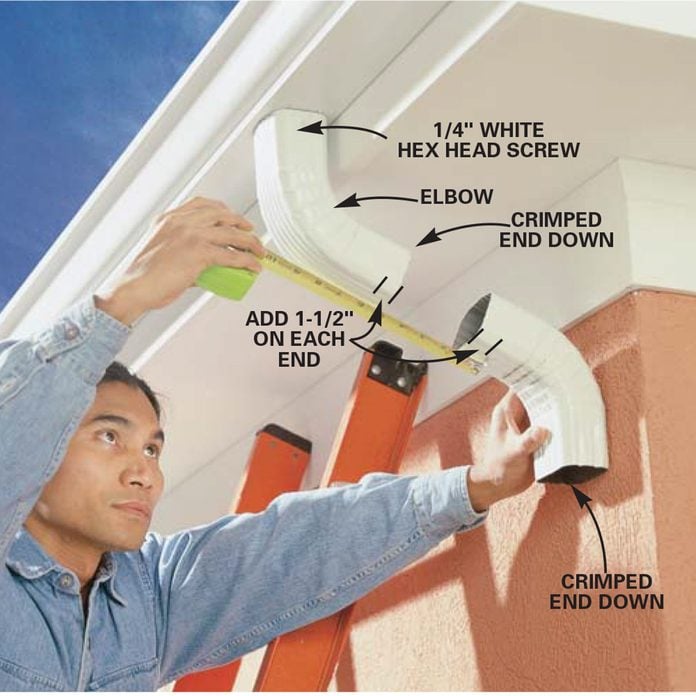
Attach Elbows to the Downspout
- Nosotros're using standard 2x3-in. downspouts, just the procedure for oversized 3x4-in. ones is the same.
- Get together the elbows and downspout tube with the crimped ends facing down to foreclose water from leaking out of the joints.
- Use sheet metallic screws rather than rivets so you can detach the downspouts to clean them if necessary.
- Pro tip: Pros prefer pre painted 1/4-in. hex head screws with abrupt points, called "zippers" because they're easy to install. We found these screws in the aluminum siding section of a home center, but a gutter supplier would be another good source.
- Screw an elbow to the downspout outlet.
- Hold another elbow against the wall and measure betwixt them.
- Permit for a i-1/ii-in. overlap at each end.
- Use a hacksaw to cut this length from the uncrimped end of a downspout tube.
- You can cutting downspout tubing with a 32-tooth hacksaw blade, but the pro we talked to uses a circular saw with a standard 24-molar carbide blade.
- Pro tip: A ability miter box also works great for cut gutters and downspouts. Use an erstwhile bract, though. Protect yourself from flying bits of metal with goggles, leather gloves, jeans and a long-sleeve shirt.
Step sixteen
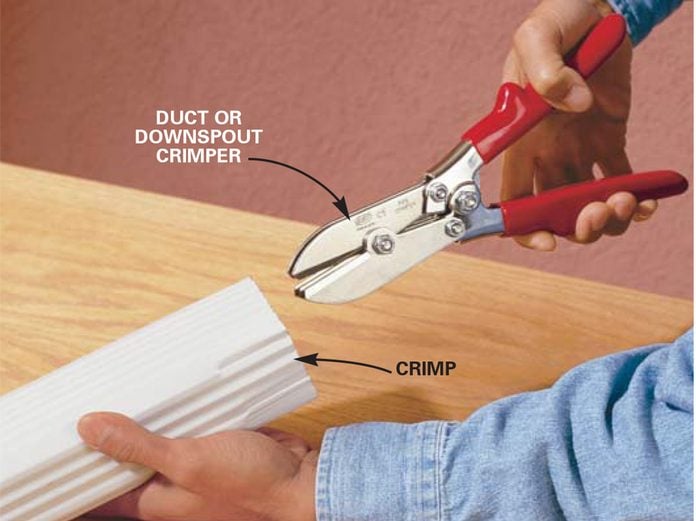
Crimp One End of the Downspout
- Crimp one stop of the short length of downspout with a special sheet metal curling.
- With the three blades on the inside of the tube, hold the curling against the within corner of the tube and clasp.
- Crimp three times across both long edges and twice on the narrow sides.
- Attach this short section of downspout to the two elbows with two 1/4-in. hex head sheet metal screws into each joint.
Step 17
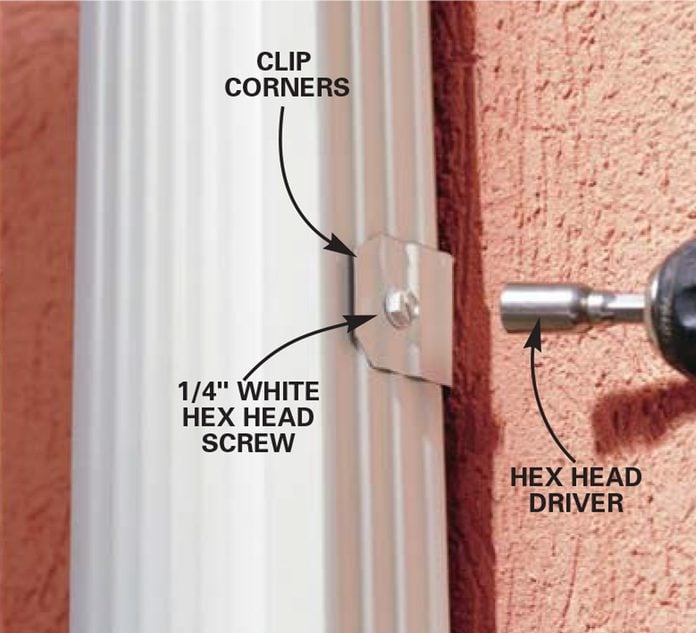
Fasten Brackets to the Wall
- Each length of gutter and every elbow is squeezed, or crimped, on ane end to allow the pieces to fit together, 1 within the other.
- Since 10-ft. lengths of downspout are just crimped on 1 terminate, yous'll have to crimp one end of any cutoff slice to arrive fit inside the side by side elbow or downspout section.
- Pro tip: If you just have one or two downspouts to install, you tin can employ a needle-nose pliers to twist crimps into the end. Just an cheap crimping tool will save you tons of fourth dimension and frustration.
- Crimp one end of the curt length of downspout with a special sheet metal crimper.
- With the three blades on the inside of the tube, hold the crimper against the inside corner of the tube and squeeze.
- Crimp 3 times across both long edges and twice on the narrow sides.
- Attach this short section of downspout to the two elbows with two one/iv-in. hex head sheet metal screws into each joint.
Pace 18
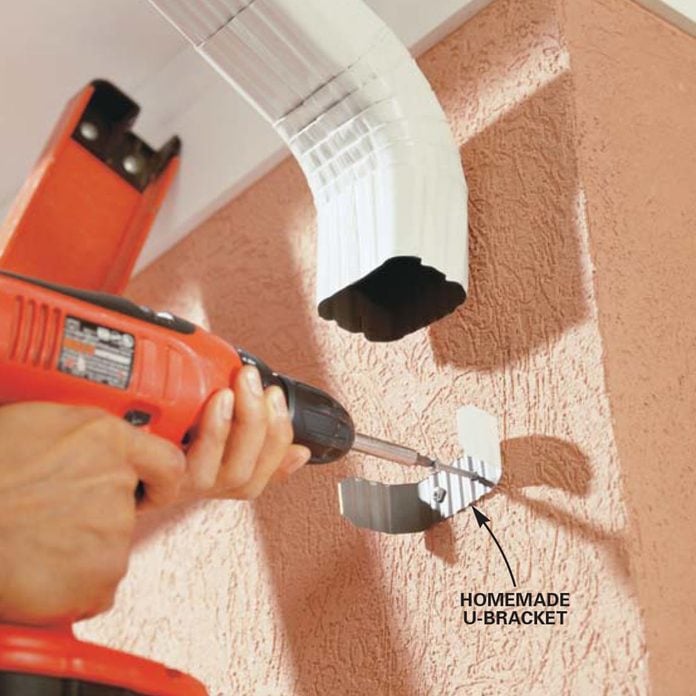
Attach the Downspout to the Brackets
- Stop the gutter chore past attaching the downspouts to the wall.
- Pro tip: If you lot tin't find U-shaped brackets, make them from sections of downspout. They wait meliorate than the bands that wrap effectually the outside and brand information technology easier to hang the downspouts.
- Drive screws through the brackets into the assembled downspout.
- Complete the assembly by adding a length of downspout tube to the bottom elbow to direct water away from the foundation.
Step 19
After Installing Gutters, Maintenance Is the Key to Long-Lasting Gutters
- Clean leaves from your gutters twice a year, or hire a company that specializes in gutter cleaning and maintenance.
- You'll extend the life of your gutters and eliminate problems like backed-up gutters and plugged downspouts.
Step xx
Ownership Gutters
- Ten-foot lengths of metallic gutters, downspouts and accessories are available at home centers, lumberyards and full-service hardware stores.
- Standard colors are brown and white.
- Matching inside and exterior corners, downspout elbows and accessories are also available.
- Buy special gutter sealant to seal the seams.
- It's available in small toothpaste-type tubes or ten-oz. caulk gun tubes.
- Using many of the same bones techniques we prove in this story, you can install your own "seamless" gutters.
- Many seamless gutter companies volition come up to your business firm, measure and form continuous lengths of aluminum gutter to fit, and sell you all the installation accessories you lot'll demand.
- Information technology costs a little more than, simply y'all'll be able to choose from dozens of colors and eliminate seams in the gutter runs.
- You'll also relieve the hassle of measuring, shopping and hauling the parts home in your VW issues.
Originally Published: July 27, 2022
Source: https://www.familyhandyman.com/project/how-to-install-gutters/
0 Response to "How To Put Rain Gutters On A House"
Post a Comment